Accept or Reject?
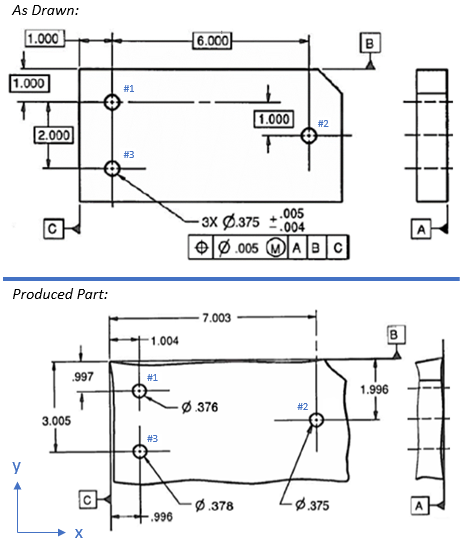
Compare the produced part dimensions to the drawing requirements shown. Based on the positional tolerances, which hole number(s) would pass an inspection? Which hole number(s) would be rejected?

Expand Hint
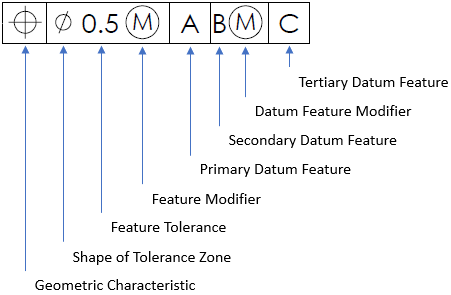
Breaking down the general parts of a feature control frame:

The drawing specifies a Max Material Condition (MMC) feature modifier for the .005 dia positional tolerance. A MMC modifier is the condition in which a feature of size contains the maximum amount of material within the stated limits of size. For a hole, MMC is the dimension that produces the smallest cutout. Thus,
$$$MMC_{hole}=.375-.004=.371$$$
Hint 2

Breaking down the general parts of a feature control frame:

The drawing specifies a Max Material Condition (MMC) feature modifier for the .005 dia positional tolerance. A MMC modifier is the condition in which a feature of size contains the maximum amount of material within the stated limits of size. For a hole, MMC is the dimension that produces the smallest cutout. Thus,
$$$MMC_{hole}=.375-.004=.371$$$
For a positional tolerance with a MMC feature modifier, there is a linearly increasing bonus tolerance as the actual hole size leans closer to LMC. LMC, or Least Material Condition, is the version of a feature that contains the least amount of material within the called out size limits. For a hole, LMC is the dimension that produces the largest cutout. Thus,
$$$LMC_{hole}=.375+.005=.380$$$
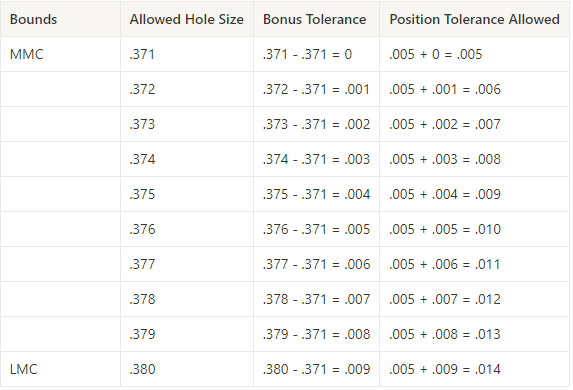
Now that the upper (LMC) and lower (MMC) bounds for hole size is determined, let’s calculate the bonus tolerances to find the total positional tolerance allowed for each hole size.

To find the actual hole position on the produced part:
$$$Z=2\sqrt{X^2+Y^2}$$$
where
$$X$$
is the difference between the x-coordinate hole position on the produced part and the drawing’s basic dimension associated with the hole’s x-direction, and
$$Y$$
is the difference between the y-coordinate hole position on the produced part and the drawing’s basic dimension associated with the hole’s y-direction. Make sure to track +/- directions based on the established coordinate system.
A manufactured hole would be accepted/pass inspection if:
$$$Z\leq Position\:Tolerance\:Allowed$$$
A manufactured hole would be rejected/fail inspection if:
$$$Z> Position\:Tolerance\:Allowed$$$
Thus,

#1: Accept
#2: Reject
#3: Reject
Time Analysis
See how quickly you looked at the hint, solution, and answer. This is important for making sure you will finish the FE Exam in time.- Hint: Not clicked
- Solution: Not clicked
- Answer: Not clicked
Similar Problems from FE Sub Section: Definitions used in ASME Y14.5
092. MMC vs LMC
215. Positional Tolerance
398. MMC & LMC
402. GTOL
404. Feature Control Frame
425. A Hole’s Virtual Size
426. A Pin’s Virtual Size
427. MMC Hole’s Virtual Size
428. MMC Pin’s Virtual Size
Similar Problems from FE Sub Section: Modifying Symbols
053. GD&T
072. Tolerance Analysis
215. Positional Tolerance
402. GTOL
404. Feature Control Frame
409. GDT Symbols
411. GDT Rule #1
414. GTOL Rule #1
415. Geometric Symbols
417. ASME Y14.5 Symbols
421. RFS Boundaries
422. LMC Boundaries
423. MMC Boundaries
425. A Hole’s Virtual Size
426. A Pin’s Virtual Size
427. MMC Hole’s Virtual Size
428. MMC Pin’s Virtual Size
Similar Problems from FE Section: Geometric Dimensioning and Tolerancing (GD&T)
053. GD&T
072. Tolerance Analysis
092. MMC vs LMC
215. Positional Tolerance
398. MMC & LMC
402. GTOL
404. Feature Control Frame
409. GDT Symbols
411. GDT Rule #1
414. GTOL Rule #1
415. Geometric Symbols
417. ASME Y14.5 Symbols
421. RFS Boundaries
422. LMC Boundaries
423. MMC Boundaries
425. A Hole’s Virtual Size
426. A Pin’s Virtual Size
427. MMC Hole’s Virtual Size
428. MMC Pin’s Virtual Size